Friday, June 19, 2015

Digital Audio processing with c++ ( Chapter 1 ) - Configure Aquila Digital signal processing Library in Visual Studio

Aquila is  Digital signal processing Library that work with C++.And it has lots of features to analyze and process signals like audio.You can learn more about this library from official  website.

Today I'm going to show how to configure it visual studio programming environment.

Working environment

Windows 8.1
Visual studio 11

Development Tools


  • cmake     Download   (make sure to download binary distributions)


Library Configuration

  1. Install MinGW C++ compiler. During installation , select “C++ Compiler” and “MSYS Basic System” for installation
  2. Add system PATH to "c:/mingw/bin" (Right click on my computer-> Properties->Advance system settings->Environment variable -> select path and click edit) example
  3. Install Cmake
  4. unzip Aquila to C:\Aquila-src
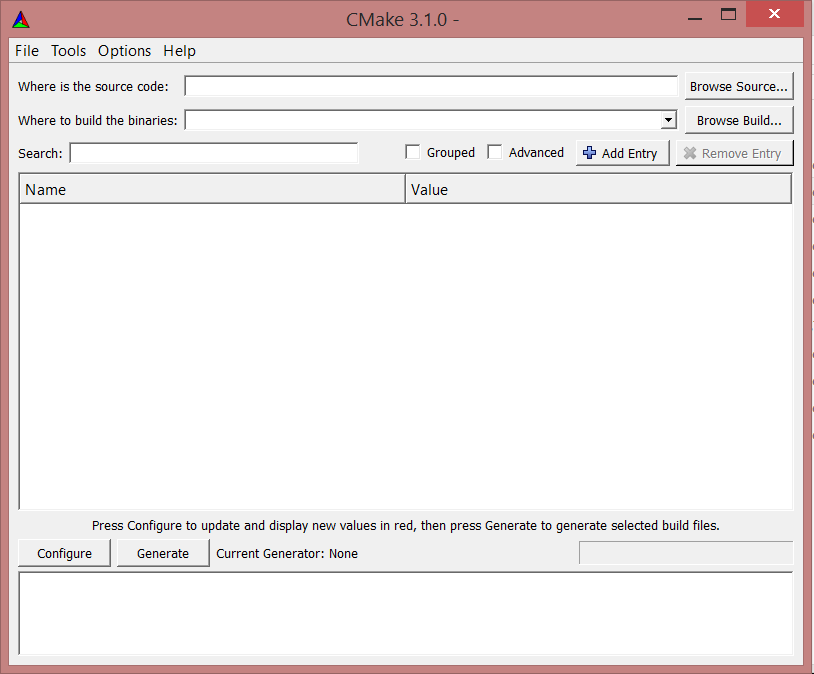
  5. Run cmake GUI tool
  6. Choose C:\Aquila-src\ as source
  7. Choose the destination, C:\Aquila-build ,This is where to build the binaries
  8. Press Configure button, choose MinGW Makefiles as the generator.(then in red highlighted area We can choose many options but it's better to use default options if you are beginner)
  9. Press the Configure button again then press the Generate button
  10. Exit the cmake program when the generating is done
  11. Run the command line mode (cmd.exe) and go to the destination directory Aquila-build (type :- cd /Aquila-build)
  12. Type "mingw32-make". You can see a progress of building binaries. If the command is not found error occur problem is in system path (step 2)
  13. Then type "mingw32-make install" (you can see install path .we need it in next step)
In addition to this we need to do small one thing .That is we need to add these 2 files to your install directly (default directly C:\Program Files (x86)\Aquila\lib) 

**I try this few days and this is not work for me .then I found this 2 files need to place in that directly for work this library

Create Project 


  1. Open Visual Studio IDE
  2. Create new Console Application
  3. Go to project properties (Project-> Properties)
  4. Go to C/C++ -> General then add path of  "include" to Additional Include Directories  (example :- C:\Program Files (x86)\Aquila\include)
  5. Go to linker-> General then add path of  "lib" to Additional Library Directories  (example:- C:\Program Files (x86)\Aquila\lib)
  6. Go to linker-> input then add library files to Additional Dependencies (Add Aquila.lib ,Ooura_fft.lib )

Implementation


Then run this code

#include "aquila/global.h"
#include "aquila/source/generator/SineGenerator.h"
#include "aquila/transform/FftFactory.h"
#include "aquila/tools/TextPlot.h"

int main()
{
    // input signal parameters
    const std::size_t SIZE = 64;
    const Aquila::FrequencyType sampleFreq = 2000;
    const Aquila::FrequencyType f1 = 125, f2 = 700;

    Aquila::SineGenerator sineGenerator1 = Aquila::SineGenerator(sampleFreq);
    sineGenerator1.setAmplitude(32).setFrequency(f1).generate(SIZE);
    Aquila::SineGenerator sineGenerator2 = Aquila::SineGenerator(sampleFreq);
    sineGenerator2.setAmplitude(8).setFrequency(f2).setPhase(0.75).generate(SIZE);
    auto sum = sineGenerator1 + sineGenerator2;

    Aquila::TextPlot plt("Input signal");
    plt.plot(sum);

    // calculate the FFT
    auto fft = Aquila::FftFactory::getFft(SIZE);
    Aquila::SpectrumType spectrum = fft->fft(sum.toArray());

    plt.setTitle("Spectrum");
    plt.plotSpectrum(spectrum);

    return 0;
}


and you will get an output if you get error about "LNK2019 error c++ unresolved external symbol"
Go to BUILD->Configuration Manager and change platform to 64 bit

If  have any question please post a comment .This post written by using my experience.so sometimes there can be simple approach than this.Please be kind enough to mention that one also Thank you :)

***Update If you have a trouble with building an own library you can try my pre-build library . I have only tested 64bit lib files but I already added 32bit versions.Try and please kind enough to mentioned is this library works fine or not

Reference official website

Wednesday, April 1, 2015

Digital Image processing with c++ ( Chapter 7 ) - Image Smoothing (Gaussian filter)

Hi My dear friends.Today i'm going to show how to implement Gaussian Smoothing filter using C++ and openCV .Theory behind this Gaussian filter is you can learn by using this reference and it clearly mention how to make Gaussian weight matrix.And I'm going to show how I implement this code by using above mention links theory.


#include "stdafx.h"
#include <iostream>

#include <opencv2/highgui/highgui.hpp>
#include <opencv2/imgproc/imgproc.hpp>
#include <opencv2/core/core.hpp>

using namespace cv;
using namespace std;


int main()
{

 /* start producing Gaussian filter kernel*/
 const double PI = 4.0*atan(1.0) ;
 double sigma=  2;
 const int kernalWidth=5;
 const int kernalHeight=5;

 float kernalArray[kernalWidth][kernalHeight];

 double total=0;

 //calculate each relavant value to neighour pixels and store it in 2d array
 for(int row=0;row<kernalWidth;row++){

  for(int col=0;col<kernalHeight;col++){

   float value=(1/(2*PI*pow(sigma,2)))*exp(-(pow(row-kernalWidth/2,2)+pow(col-kernalHeight/2,2))/(2*pow(sigma,2)));

   kernalArray[row][col]=value;

   total+=value;
  }
 }

 //Scale value in 2d array in to 1
 for(int row=0;row<kernalWidth;row++){
  for(int col=0;col<kernalHeight;col++){

   kernalArray[row][col]=kernalArray[row][col]/total;

  }
 }

 /*End producing Gaussian filter kernel*/

 Mat RGBImage;

 RGBImage =imread("C:\\stripeys-big-red-eyes-sharp.jpg");

 Mat grayScaleImage(RGBImage.size(),CV_8UC1);
 Mat openCvGaussianFilterImage(RGBImage.size(),CV_8UC1);

 Mat FinalImage(RGBImage.size(),CV_8UC1);
 cvtColor(RGBImage,grayScaleImage,CV_RGB2GRAY);


 int rows=grayScaleImage.rows;
 int cols=grayScaleImage.cols;


 int verticleImageBound=(kernalHeight-1)/2;
 int horizontalImageBound=(kernalWidth-1)/2;

 //Assian Gaussian Blur value of the center point.Repeating this process for all other points through image

 for(int row=0+verticleImageBound;row<rows-verticleImageBound;row++){

  for(int col=0+horizontalImageBound;col<cols-horizontalImageBound;col++){

   float value=0.0;

   for(int kRow=0;kRow<kernalHeight;kRow++){
    for(int kCol=0;kCol<kernalWidth;kCol++){
     //multiply pixel value with corresponding gaussian kernal value
     float pixel=grayScaleImage.at<uchar>(kRow+row-verticleImageBound,kCol+col-horizontalImageBound)*kernalArray[kRow][kCol];
     value+=pixel;
    }
   }
   //assign new values to central point
   FinalImage.at<uchar>(row,col)=cvRound(value);

  }

 }

 //Genarate same GaussianBlur image using inbuilt openCv function
 GaussianBlur( grayScaleImage, openCvGaussianFilterImage, Size( 5, 5 ), 0 ,0 );

 namedWindow("Original Image",1);
 imshow("Original Image",grayScaleImage);

 namedWindow("Filtered Image",1);
 imshow("Filtered Image",FinalImage);

 namedWindow("openCvGaussianFilterImage",1);
 imshow("openCvGaussianFilterImage",openCvGaussianFilterImage);
 waitKey();
 return 0;
}

You can download image from this link

You can see results like this

This is our original image

This is open CV generated Gaussian blur image

This is our implemented algorithm's Gaussian blur image


Please note this .I'm not an expert on these things.Still i'm learning Image processing. This code is written according to my understand about the concepts of Gaussian smooth filter.If I did some mistake, missed something or if you have any question please leave a comment bellow.
Thank you :)

Saturday, March 28, 2015

Digital Image processing with c++ ( Chapter 6 ) - Image Smoothing (Median filter)

Hi All Today i'm going explain you how to add median filter to image

#include "stdafx.h"
#include <iostream>
#include <opencv2/highgui/highgui.hpp>
#include <opencv2/imgproc/imgproc.hpp>
#include <opencv2/core/core.hpp>

using namespace cv;
using namespace std;


int main()
{
 Mat RGBImage;

 RGBImage =imread("c:/Pictures/noisy.jpg");

 Mat grayScaleImage(RGBImage.size(),CV_8UC1);
 grayScaleImage=Scalar(0);
 Mat FinalImage(RGBImage.size(),CV_8UC1);
 cvtColor(RGBImage,grayScaleImage,CV_RGB2GRAY);
 int kernalWidth=3;
 int kernalHeight=3;
 int kernalSize=kernalHeight*kernalWidth;
 int rows=grayScaleImage.rows;
 int cols=grayScaleImage.cols;
 int pixelArray[9];

 int verticleImageBound=(kernalHeight-1)/2;
 int horizontalImageBound=(kernalWidth-1)/2;

 for(int row=0+verticleImageBound;row<rows-verticleImageBound;row++){

  for(int col=0+horizontalImageBound;col<cols-horizontalImageBound;col++){


   int pixelArrayIndex=0;
   for(int kRow=0;kRow<kernalHeight;kRow++){
    for(int kCol=0;kCol<kernalWidth;kCol++){
     pixelArray[pixelArrayIndex]=grayScaleImage.at<uchar>(kRow+row-verticleImageBound,kCol+col-horizontalImageBound);
     pixelArrayIndex++;
    }
   }


   int elements = sizeof(pixelArray) / sizeof(pixelArray[0]); 
   sort(pixelArray, pixelArray + elements);
   FinalImage.at<uchar>(row, col)=pixelArray[(kernalSize+1)/2];

  }

 }


 namedWindow("Original Image",1);
 imshow("Original Image",grayScaleImage);

 namedWindow("Filtered Image",1);
 imshow("Filtered Image",FinalImage);

 waitKey();
 return 0;
}


When you run this code you see results like this


Thursday, March 26, 2015

Digital Image processing with c++ ( Chapter 5 ) - Image Smoothing (Mean filter)

Today i'm going to explain how to add mean filter to noisy image


#include "stdafx.h"
#include <iostream>
#include <opencv2/highgui/highgui.hpp>
#include <opencv2/imgproc/imgproc.hpp>
#include <opencv2/core/core.hpp>

using namespace cv;
using namespace std;


int main()
{
 Mat RGBImage;

 RGBImage =imread("c:/Pictures/8_Color-Noise.png");

 Mat grayScaleImage(RGBImage.size(),CV_8UC1);
 grayScaleImage=Scalar(0);
 Mat FinalImage(RGBImage.size(),CV_8UC1);
 cvtColor(RGBImage,grayScaleImage,CV_RGB2GRAY);
 int kernalWidth=7;
 int kernalHeight=7;
 int kernalSize=kernalHeight*kernalWidth;
 int rows=grayScaleImage.rows;
 int cols=grayScaleImage.cols;

 int verticleImageBound=(kernalHeight-1)/2;
 int horizontalImageBound=(kernalWidth-1)/2;

 for(int row=0+verticleImageBound;row<rows-verticleImageBound;row++){

  for(int col=0+horizontalImageBound;col<cols-horizontalImageBound;col++){

   int ave=0;
   for(int kRow=0;kRow<kernalHeight;kRow++){
    for(int kCol=0;kCol<kernalWidth;kCol++){
     ave+=grayScaleImage.at<uchar>(kRow+row-verticleImageBound,kCol+col-horizontalImageBound);

    }
   }
   FinalImage.at<uchar>(row, col)=ave/kernalSize;

  }

 }


 namedWindow("Gray",0);
 resizeWindow("Gray",512,512);
 imshow("Gray",grayScaleImage);
 namedWindow("smooth",0);
 resizeWindow("smooth",512,512);
 imshow("smooth",FinalImage);

 waitKey();
 return 0;
}


Sample image can download from here


When you run this code you see results like this


Thursday, February 19, 2015

Digital Image processing with c++ ( Chapter 3 ) - Color Histogram

Today I'm going explain about how to create color histogram using Gray scale image. Histogram represent color frequency of the image .
Another words it represents the number of pixels that have each colors in fixed list of color ranges.
Histogram is one of most useful things when we going to take decisions about image.Because image processing deal with colors .
So by using histogram we can identify dominant colors ,color distribution ,max occurrence ,Contrast stretching etc.
We will discuss these things in later .

Lets consider our image is like this .Each pixel represent a color from different 8 colors

1 4 6 7 7
2 0 5 5 4
1 7 2 0 2
6 4 7 5 2
0 0 5 2 1

We can summarize these information in to this table like this

Color Frequncy
0 4
1 3
2 5
3 0
4 3
5 4
6 2
7 4
Total 25


Then the relevant histogram would be like this


Now I think you have some kind of idea about what is Color Histogram
so then we can move to code.We are calculating and drawing histogram for Gray scale images.

#include 
#include 
#include 

using namespace cv;
using namespace std;

int main()
{
Mat RGBImage;

RGBImage =imread("c:/example_image.png");

Mat grayScaleImage(RGBImage.size(),CV_8UC1);

cvtColor(RGBImage,grayScaleImage,CV_RGB2GRAY);


Mat histogramTable(1,256,CV_32FC1);
histogramTable=Scalar(0);

int rows=grayScaleImage.rows;
int cols=grayScaleImage.cols;

 //enter pixel values to hitro map
for(int i=0;i
 for(int j=0;j
 int pixelValue=(int)grayScaleImage.at(i,j);
 int fre=(int)histogramTable.at<float>(0,pixelValue);
 fre++;
 histogramTable.at<float>(0,pixelValue)=fre;
  }
 }

 //find maximum value of histrogram
int maxFre=0;

for(int count=0;count<256;count++){
 int histoIndexValue=histogramTable.at<float>(0,count);

 if(histoIndexValue>maxFre){
  maxFre=histoIndexValue;
 }

 }

Mat scaledHistogramTable(1,256,CV_32FC1);
 //create scale histro
for(int count=0;count<256;count++){

float histroIndexValue=histogramTable.at<float>(0,count);

scaledHistogramTable.at<float>(0,count)=histroIndexValue/maxFre;

 }

Mat histogramDrawer(512,256,CV_8UC3);
histogramDrawer=Scalar(0);

 //Draw histogram
for(int count=0;count<256;count++){

float histoValue=511-scaledHistogramTable.at<float>(0,count)*512;               

line(histogramDrawer,Point(count,511),Point(count,histoValue),
Scalar(255,255,0));

 }

 namedWindow("HistoGram",1);
 namedWindow("GrayScaleImage",1);

 imshow("HistoGram",histogramDrawer);
 imshow("GrayScaleImage",grayScaleImage);

 waitKey();
 return 0;
}


Sometimes you will feel that this is a complex code but I will promise you after going through this steps carefully you will find this is very simple.
This code include that the concept I explained above.

In this code sometimes we have to use Mat objects that has 32 bit depth and floating point data types. Therefore you can see Mat objects like CV_32FC1


Mat histogramTable(1,256,CV_32FC1);
 histogramTable=Scalar(0);

 int rows=grayScaleImage.rows;
 int cols=grayScaleImage.cols;

 //enter pixel values to hitro map
for(int i=0;i
 for(int j=0;j
 int pixelValue=(int)grayScaleImage.at(i,j);  
        int fre=(int)histogramTable.at<float>(0,pixelValue);
 fre++;
 histogramTable.at<float>(0,pixelValue)=fre;
  }
 }


In this we have to get color value of each and every pixel and store it in histogramTable Mat object.Make sure make all values equal to zero before start this for loop by using


histogramTable=Scalar(0);


Then we have to scale histogram to 1 for that we divide each and every frequency by maximum frequency value


//find maximum value of histrogram

int maxFre=0;

for(int count=0;count<256;count++){
       int histoIndexValue =histogramTable.at<float>0,count);

  if(histoIndexValue>maxFre){
   maxFre=histoIndexValue;
  }

 }

 Mat scaledHistogramTable(1,256,CV_32FC1);

 //create scale histro

 for(int count=0;count<256;count++){

float histroIndexValue=histogramTable.at<float>(0,count);

scaledHistogramTable.at<float>(0,count)=histroIndexValue/maxFre;

 }


Then Scaled values stores in scaledHistogramTable Mat object.
After that we have to Draw Histogram.


Mat histogramDrawer(512,256,CV_8UC3);
 histogramDrawer=Scalar(0);

 //Draw histogram
 for(int count=0;count<256;count++){

float histoValue=511-scaledHistogramTable.at<float>(0,count)*512;
line(histogramDrawer,Point(count,511),Point(count,histoValue),Scalar(255,255,0));

 }


Size of our histogram is width=256 and height= 512.And for loop draw lines and complete histogram.


float histoValue=511-scaledHistogramTable.at<float>(0,count)*512;


Normally Mat object (0,0) start from top left corner .
But we draw histogram from bottom to top therefore we have to calculate relevant value by subtract from 511


line(histogramDrawer,Point(count,511),Point(count,histoValue),Scalar(255,255,0));


By using line function we can draw lines .
As first parameter we pass Mat object. Histogram will draw on it.
As 2nd parameter we pass starting point of the line and 3rd parameter is ending point .
As last parameter we enter color value of the line

Then we can get output like this


If you have Any question ,complain or suggestion please leave a comment .I always like to help you. :) See you soon .Thank you.

Monday, January 26, 2015

Digital Image processing with c++ ( Chapter 2 ) - Convert RGB Image to Gray Scale

Today I'm going to explain about how to convert color (RGB) image to gray scale image
Gray scale is shades of grey , darkest or weakest shade is black and the lightest or strongest shade is white.It has no color components like RGB image.It has one component gray and different intensity levels in between .Gray scale intensity is stored as an 8-bit integer giving 256 possible different shades of gray from black to white.

I'm going to explain this conversion by using 2 methods

  1. By using inbuilt open CV function
  2. By using custom Algorithm

**** Note that I'm explaining these tutorials using visual studio

By using inbuilt open CV function


#include <opencv2/highgui/highgui.hpp>
#include <opencv2/imgproc/imgproc.hpp>
#include <opencv2/core/core.hpp>

using namespace cv;

int main()
{
 Mat RGBImage;

 RGBImage =imread("c:/example_image.png");

 Mat grayScaleImage(RGBImage.size(),CV_8UC1);

 cvtColor(RGBImage,grayScaleImage,CV_RGB2GRAY);

 namedWindow("RGBImage",1);
 namedWindow("GrayScaleImage",1);

 imshow("RGBImage",RGBImage);
 imshow("GrayScaleImage",grayScaleImage);

 waitKey();
 return 0;
}

this is very easy method because inbuilt Open CV function save your day

 Mat RGBImage;
 RGBImage =imread("c:/example_image.png");

From this line you can read image and assign it to RGBImage Mat object

Mat grayScaleImage(RGBImage.size(),CV_8UC1);

From this line we can create Mat object named "grayScaleImage"
As first paramether we have to pass the size of that object and we make the same size as RGBImage by using RGBImage.size()
And also that object bit depth ,data type and number of channels need to mention as next parameter.
CV_8UC1 mean our object has 8 bit depth unsigned char data type (U) with one channel (C1)

cvtColor(RGBImage,grayScaleImage,CV_RGB2GRAY);

From this we convert our RBG image to Gray Scale image by using cvtColor function.
As first paramether we pass sourse image next we pass output image and final parameter we mentioned conversion type .
In this case we convert RGB to Gray scale for that we pass CV_RGB2GRAY as our 3rd parameter.

namedWindow("RGBImage",1);
namedWindow("GrayScaleImage",1);

imshow("RGBImage",RGBImage);
imshow("GrayScaleImage",grayScaleImage

From this line we can get our results.

By using custom Algorithm


#include <opencv2/highgui/highgui.hpp>
#include <opencv2/imgproc/imgproc.hpp>
#include <opencv2/core/core.hpp>

using namespace cv;

int main()
{
 Mat RGBImage;

 RGBImage =imread("c:/example_image.png");

 Mat grayScaleImage(RGBImage.size(),CV_8UC1);

 int rows=RGBImage.rows;
 int cols=RGBImage.cols;
 

 for(int i=0;i<rows;i++){
  for(int j=0;j<cols;j++){

   Vec3b intensity=RGBImage.at<Vec3b>(i,j);

   int blue=intensity.val[0];
   int green =intensity.val[1];
   int red=intensity.val[2];

   grayScaleImage.at<uchar>(i,j)=blue*0.0722+green*0.7152+red*0.2126;

  }

 }

 namedWindow("RGBImage",1);
 namedWindow("GrayScaleImage",1);

 imshow("RGBImage",RGBImage);
 imshow("GrayScaleImage",grayScaleImage);

 waitKey();
 return 0;
}

By using these 2 for loops we can access to each and every location of Mat object (pixel of image)

 
for(int i=0;i<rows;i++){
  for(int j=0;j<cols;j++){

   Vec3b intensity=RGBImage.at<Vec3b>(i,j);

   int blue=intensity.val[0];
   int green =intensity.val[1];
   int red=intensity.val[2];

   grayScaleImage.at<uchar>(i,j)=blue*0.0722+green*0.7152+red*0.2126;

  }
 } 

RGB has 3 color component we can consider every pixel is 3 dimensional vector .
Therefore by using this line we can assign it to 3d vector

   Vec3b intensity=RGBImage.at<Vec3b>(i,j);
.
Next we can get each and every 3 color component value from each pixel

     int blue=intensity.val[0];
     int green =intensity.val[1];
     int red=intensity.val[2];

Then we can calculate relevant gray scale value respect to these 3 color component values by using this function

grayScaleImage.at<uchar>(i,j)=blue*0.0722+green*0.7152+red*0.2126;

Then we assign that values to grayScaleImage Mat object pixel values


If you have Any question ,complain or suggestion please leave a comment .I always like to help you. :) See you soon .Thank you.

Monday, January 19, 2015

Digital Image processing with c++ ( Chapter 1 ) - Configure eclipse with open CV


This is my first blog post so there can be many mistakes please help to to correct my mistakes and make this blog more impressive.Today I'm going to explain you how to Configure working environment for Digital image processing with C++.For that first we need to download few softwares and libraries.

Prerequisites


Java JRE
Windows 7 or later

Development tools


  • Eclipse IDE for C/C++     Download
  • MinGW C++ compiler     Download
  • cmake     Download   (make sure to download binary distributions)
  • OpenCV     Download  


  • Here I use Cmake to compile my own binaries because lots of questions going on that precompiled binaries are NOT working for well.

    Configuration


    1. Install MinGW C++ compiler. During installation , select “C++ Compiler” and “MSYS Basic System” for installation
    2. Add system PATH to "c:/mingw/bin" (Right click on my computer-> Properties->Advance system settings->Environment variable -> select path and click edit) example
    3. Install Cmake
    4. Install/unzip Opencv to C:\OpenCV\
    5. Run cmake GUI tool
    6. Choose C:\OpenCV\ as source
    7. Choose the destination, C:\OpenCV\x86 ,This is where to build the binaries
    8. Press Configure button, choose MinGW Makefiles as the generator.(then in red highlighted area We can choose many options but it's better to use default options if you are beginner)
    9. Press the Configure button again then press the Generate button
    10. Exit the cmake program when the generating is done
    11. Run the command line mode (cmd.exe) and go to the destination directory C:\OpenCV\x86 (type :- cd /OpenCV\x86)
    12. Type "mingw32-make". You can see a progress of building binaries. If the command is not found error occur problem is in system path (step 2)
    13. Add system PATH to C:\OpenCV\x86\bin (similar as step 2)
    14. Restart Computer
    15. Extract the downloaded Eclipse and run it
    16. Creating a new C++ Project from the File and New menu
    17. Select “Hello World C++ Project” under Executable for the Project Type, and MinGW GCC for the Toolchain of your New C++ Project. Type a Project Name and click the Finish button.
    18. Add “-static-libgcc -static-libstdc++” as Linker flags for your new project. This text should be added to the Linker flags field, which can be found by right-clicking on the new Project in the Project Explorer and clicking on Properties. Under the Project Properties, expand the C/C++ Build menu and click on Settings. Under the Tool Settings tab, expand the MinGW C++ Linker menu and click on Miscellaneous. Add the text to the Linker flags field, then click the Apply button. (More details ) about step 16 to 18
    19. Go to Project > Properties > C/C++ Build > Settings > GCC C++ Compiler > Includes, and add the source OpenCV folder "C:\OpenCV\build\include"
    20. Add the built OpenCV library folder, "C:\OpenCV\x86\lib" to Library search path (-L)
    21. Go to Project > Properties > C/C++ Build > Settings > MinGW C++ Linker > Libraries, and add to the Libraries (-l) ONE BY ONE (this could vary from project to project, you can add all of them if you like or some of them just the ones that you need for your project,to run our simple project "opencv_core2410 " and "opencv_highgui2410 "):
        opencv_calib3d2410
        opencv_contrib2410
        opencv_core2410
        opencv_features2d2410
        opencv_flann2410
        opencv_gpu2410
        opencv_highgui2410
        opencv_imgproc2410
        opencv_legacy2410
        opencv_ml2410
        opencv_nonfree2410
        opencv_objdetect2410
        opencv_photo2410
        opencv_stitching2410
        opencv_video2410
        opencv_videostab2410

      *2410 mean opencv version 2.4.10 therefore this will need to change if you use other version

    22. Copy this code to your work place

      #include <opencv2/highgui/highgui.hpp>
      #include <opencv2/core/core.hpp>
      
      using namespace std;
      using namespace cv;
      
      int main()
      {
      
          Mat img=imread("c:/example_image.png");
          namedWindow("cat",WINDOW_AUTOSIZE);
          imshow("cat",img);
          waitKey(0);
          return 1;
      
      }
      

      (download this sample image and save it in c:/example_image.png)
    23. Click Build Project under the Project menu, then click Run under the Run menu.
    24. example_image.png will pop up !!!!!!!!!!!!!!

    Note :- if error occurs like this
    'cv::Exception' what(): C:\opencv\sources\modules\highgui\src\window.cpp:261: error: (-215) size.width>0 && size.height>0 in function imshow
    Problem is incorrect path to image (c:/example_image.png)