Showing posts with label Image processing. Show all posts

Wednesday, April 1, 2015

Digital Image processing with c++ ( Chapter 7 ) - Image Smoothing (Gaussian filter)

Hi My dear friends.Today i'm going to show how to implement Gaussian Smoothing filter using C++ and openCV .Theory behind this Gaussian filter is you can learn by using this reference and it clearly mention how to make Gaussian weight matrix.And I'm going to show how I implement this code by using above mention links theory.


#include "stdafx.h"
#include <iostream>

#include <opencv2/highgui/highgui.hpp>
#include <opencv2/imgproc/imgproc.hpp>
#include <opencv2/core/core.hpp>

using namespace cv;
using namespace std;


int main()
{

 /* start producing Gaussian filter kernel*/
 const double PI = 4.0*atan(1.0) ;
 double sigma=  2;
 const int kernalWidth=5;
 const int kernalHeight=5;

 float kernalArray[kernalWidth][kernalHeight];

 double total=0;

 //calculate each relavant value to neighour pixels and store it in 2d array
 for(int row=0;row<kernalWidth;row++){

  for(int col=0;col<kernalHeight;col++){

   float value=(1/(2*PI*pow(sigma,2)))*exp(-(pow(row-kernalWidth/2,2)+pow(col-kernalHeight/2,2))/(2*pow(sigma,2)));

   kernalArray[row][col]=value;

   total+=value;
  }
 }

 //Scale value in 2d array in to 1
 for(int row=0;row<kernalWidth;row++){
  for(int col=0;col<kernalHeight;col++){

   kernalArray[row][col]=kernalArray[row][col]/total;

  }
 }

 /*End producing Gaussian filter kernel*/

 Mat RGBImage;

 RGBImage =imread("C:\\stripeys-big-red-eyes-sharp.jpg");

 Mat grayScaleImage(RGBImage.size(),CV_8UC1);
 Mat openCvGaussianFilterImage(RGBImage.size(),CV_8UC1);

 Mat FinalImage(RGBImage.size(),CV_8UC1);
 cvtColor(RGBImage,grayScaleImage,CV_RGB2GRAY);


 int rows=grayScaleImage.rows;
 int cols=grayScaleImage.cols;


 int verticleImageBound=(kernalHeight-1)/2;
 int horizontalImageBound=(kernalWidth-1)/2;

 //Assian Gaussian Blur value of the center point.Repeating this process for all other points through image

 for(int row=0+verticleImageBound;row<rows-verticleImageBound;row++){

  for(int col=0+horizontalImageBound;col<cols-horizontalImageBound;col++){

   float value=0.0;

   for(int kRow=0;kRow<kernalHeight;kRow++){
    for(int kCol=0;kCol<kernalWidth;kCol++){
     //multiply pixel value with corresponding gaussian kernal value
     float pixel=grayScaleImage.at<uchar>(kRow+row-verticleImageBound,kCol+col-horizontalImageBound)*kernalArray[kRow][kCol];
     value+=pixel;
    }
   }
   //assign new values to central point
   FinalImage.at<uchar>(row,col)=cvRound(value);

  }

 }

 //Genarate same GaussianBlur image using inbuilt openCv function
 GaussianBlur( grayScaleImage, openCvGaussianFilterImage, Size( 5, 5 ), 0 ,0 );

 namedWindow("Original Image",1);
 imshow("Original Image",grayScaleImage);

 namedWindow("Filtered Image",1);
 imshow("Filtered Image",FinalImage);

 namedWindow("openCvGaussianFilterImage",1);
 imshow("openCvGaussianFilterImage",openCvGaussianFilterImage);
 waitKey();
 return 0;
}

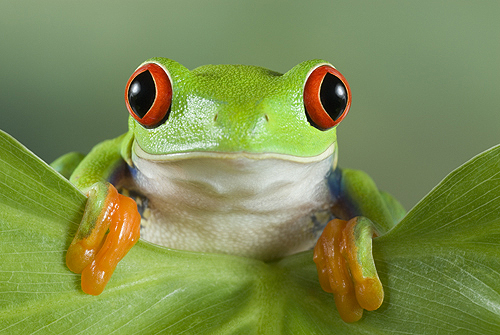
You can download image from this link

You can see results like this

This is our original image

This is open CV generated Gaussian blur image

This is our implemented algorithm's Gaussian blur image


Please note this .I'm not an expert on these things.Still i'm learning Image processing. This code is written according to my understand about the concepts of Gaussian smooth filter.If I did some mistake, missed something or if you have any question please leave a comment bellow.
Thank you :)

Thursday, March 26, 2015

Digital Image processing with c++ ( Chapter 5 ) - Image Smoothing (Mean filter)

Today i'm going to explain how to add mean filter to noisy image


#include "stdafx.h"
#include <iostream>
#include <opencv2/highgui/highgui.hpp>
#include <opencv2/imgproc/imgproc.hpp>
#include <opencv2/core/core.hpp>

using namespace cv;
using namespace std;


int main()
{
 Mat RGBImage;

 RGBImage =imread("c:/Pictures/8_Color-Noise.png");

 Mat grayScaleImage(RGBImage.size(),CV_8UC1);
 grayScaleImage=Scalar(0);
 Mat FinalImage(RGBImage.size(),CV_8UC1);
 cvtColor(RGBImage,grayScaleImage,CV_RGB2GRAY);
 int kernalWidth=7;
 int kernalHeight=7;
 int kernalSize=kernalHeight*kernalWidth;
 int rows=grayScaleImage.rows;
 int cols=grayScaleImage.cols;

 int verticleImageBound=(kernalHeight-1)/2;
 int horizontalImageBound=(kernalWidth-1)/2;

 for(int row=0+verticleImageBound;row<rows-verticleImageBound;row++){

  for(int col=0+horizontalImageBound;col<cols-horizontalImageBound;col++){

   int ave=0;
   for(int kRow=0;kRow<kernalHeight;kRow++){
    for(int kCol=0;kCol<kernalWidth;kCol++){
     ave+=grayScaleImage.at<uchar>(kRow+row-verticleImageBound,kCol+col-horizontalImageBound);

    }
   }
   FinalImage.at<uchar>(row, col)=ave/kernalSize;

  }

 }


 namedWindow("Gray",0);
 resizeWindow("Gray",512,512);
 imshow("Gray",grayScaleImage);
 namedWindow("smooth",0);
 resizeWindow("smooth",512,512);
 imshow("smooth",FinalImage);

 waitKey();
 return 0;
}


Sample image can download from here


When you run this code you see results like this


Thursday, February 19, 2015

Digital Image processing with c++ ( Chapter 3 ) - Color Histogram

Today I'm going explain about how to create color histogram using Gray scale image. Histogram represent color frequency of the image .
Another words it represents the number of pixels that have each colors in fixed list of color ranges.
Histogram is one of most useful things when we going to take decisions about image.Because image processing deal with colors .
So by using histogram we can identify dominant colors ,color distribution ,max occurrence ,Contrast stretching etc.
We will discuss these things in later .

Lets consider our image is like this .Each pixel represent a color from different 8 colors

1 4 6 7 7
2 0 5 5 4
1 7 2 0 2
6 4 7 5 2
0 0 5 2 1

We can summarize these information in to this table like this

Color Frequncy
0 4
1 3
2 5
3 0
4 3
5 4
6 2
7 4
Total 25


Then the relevant histogram would be like this


Now I think you have some kind of idea about what is Color Histogram
so then we can move to code.We are calculating and drawing histogram for Gray scale images.

#include 
#include 
#include 

using namespace cv;
using namespace std;

int main()
{
Mat RGBImage;

RGBImage =imread("c:/example_image.png");

Mat grayScaleImage(RGBImage.size(),CV_8UC1);

cvtColor(RGBImage,grayScaleImage,CV_RGB2GRAY);


Mat histogramTable(1,256,CV_32FC1);
histogramTable=Scalar(0);

int rows=grayScaleImage.rows;
int cols=grayScaleImage.cols;

 //enter pixel values to hitro map
for(int i=0;i
 for(int j=0;j
 int pixelValue=(int)grayScaleImage.at(i,j);
 int fre=(int)histogramTable.at<float>(0,pixelValue);
 fre++;
 histogramTable.at<float>(0,pixelValue)=fre;
  }
 }

 //find maximum value of histrogram
int maxFre=0;

for(int count=0;count<256;count++){
 int histoIndexValue=histogramTable.at<float>(0,count);

 if(histoIndexValue>maxFre){
  maxFre=histoIndexValue;
 }

 }

Mat scaledHistogramTable(1,256,CV_32FC1);
 //create scale histro
for(int count=0;count<256;count++){

float histroIndexValue=histogramTable.at<float>(0,count);

scaledHistogramTable.at<float>(0,count)=histroIndexValue/maxFre;

 }

Mat histogramDrawer(512,256,CV_8UC3);
histogramDrawer=Scalar(0);

 //Draw histogram
for(int count=0;count<256;count++){

float histoValue=511-scaledHistogramTable.at<float>(0,count)*512;               

line(histogramDrawer,Point(count,511),Point(count,histoValue),
Scalar(255,255,0));

 }

 namedWindow("HistoGram",1);
 namedWindow("GrayScaleImage",1);

 imshow("HistoGram",histogramDrawer);
 imshow("GrayScaleImage",grayScaleImage);

 waitKey();
 return 0;
}


Sometimes you will feel that this is a complex code but I will promise you after going through this steps carefully you will find this is very simple.
This code include that the concept I explained above.

In this code sometimes we have to use Mat objects that has 32 bit depth and floating point data types. Therefore you can see Mat objects like CV_32FC1


Mat histogramTable(1,256,CV_32FC1);
 histogramTable=Scalar(0);

 int rows=grayScaleImage.rows;
 int cols=grayScaleImage.cols;

 //enter pixel values to hitro map
for(int i=0;i
 for(int j=0;j
 int pixelValue=(int)grayScaleImage.at(i,j);  
        int fre=(int)histogramTable.at<float>(0,pixelValue);
 fre++;
 histogramTable.at<float>(0,pixelValue)=fre;
  }
 }


In this we have to get color value of each and every pixel and store it in histogramTable Mat object.Make sure make all values equal to zero before start this for loop by using


histogramTable=Scalar(0);


Then we have to scale histogram to 1 for that we divide each and every frequency by maximum frequency value


//find maximum value of histrogram

int maxFre=0;

for(int count=0;count<256;count++){
       int histoIndexValue =histogramTable.at<float>0,count);

  if(histoIndexValue>maxFre){
   maxFre=histoIndexValue;
  }

 }

 Mat scaledHistogramTable(1,256,CV_32FC1);

 //create scale histro

 for(int count=0;count<256;count++){

float histroIndexValue=histogramTable.at<float>(0,count);

scaledHistogramTable.at<float>(0,count)=histroIndexValue/maxFre;

 }


Then Scaled values stores in scaledHistogramTable Mat object.
After that we have to Draw Histogram.


Mat histogramDrawer(512,256,CV_8UC3);
 histogramDrawer=Scalar(0);

 //Draw histogram
 for(int count=0;count<256;count++){

float histoValue=511-scaledHistogramTable.at<float>(0,count)*512;
line(histogramDrawer,Point(count,511),Point(count,histoValue),Scalar(255,255,0));

 }


Size of our histogram is width=256 and height= 512.And for loop draw lines and complete histogram.


float histoValue=511-scaledHistogramTable.at<float>(0,count)*512;


Normally Mat object (0,0) start from top left corner .
But we draw histogram from bottom to top therefore we have to calculate relevant value by subtract from 511


line(histogramDrawer,Point(count,511),Point(count,histoValue),Scalar(255,255,0));


By using line function we can draw lines .
As first parameter we pass Mat object. Histogram will draw on it.
As 2nd parameter we pass starting point of the line and 3rd parameter is ending point .
As last parameter we enter color value of the line

Then we can get output like this


If you have Any question ,complain or suggestion please leave a comment .I always like to help you. :) See you soon .Thank you.

Monday, January 26, 2015

Digital Image processing with c++ ( Chapter 2 ) - Convert RGB Image to Gray Scale

Today I'm going to explain about how to convert color (RGB) image to gray scale image
Gray scale is shades of grey , darkest or weakest shade is black and the lightest or strongest shade is white.It has no color components like RGB image.It has one component gray and different intensity levels in between .Gray scale intensity is stored as an 8-bit integer giving 256 possible different shades of gray from black to white.

I'm going to explain this conversion by using 2 methods

  1. By using inbuilt open CV function
  2. By using custom Algorithm

**** Note that I'm explaining these tutorials using visual studio

By using inbuilt open CV function


#include <opencv2/highgui/highgui.hpp>
#include <opencv2/imgproc/imgproc.hpp>
#include <opencv2/core/core.hpp>

using namespace cv;

int main()
{
 Mat RGBImage;

 RGBImage =imread("c:/example_image.png");

 Mat grayScaleImage(RGBImage.size(),CV_8UC1);

 cvtColor(RGBImage,grayScaleImage,CV_RGB2GRAY);

 namedWindow("RGBImage",1);
 namedWindow("GrayScaleImage",1);

 imshow("RGBImage",RGBImage);
 imshow("GrayScaleImage",grayScaleImage);

 waitKey();
 return 0;
}

this is very easy method because inbuilt Open CV function save your day

 Mat RGBImage;
 RGBImage =imread("c:/example_image.png");

From this line you can read image and assign it to RGBImage Mat object

Mat grayScaleImage(RGBImage.size(),CV_8UC1);

From this line we can create Mat object named "grayScaleImage"
As first paramether we have to pass the size of that object and we make the same size as RGBImage by using RGBImage.size()
And also that object bit depth ,data type and number of channels need to mention as next parameter.
CV_8UC1 mean our object has 8 bit depth unsigned char data type (U) with one channel (C1)

cvtColor(RGBImage,grayScaleImage,CV_RGB2GRAY);

From this we convert our RBG image to Gray Scale image by using cvtColor function.
As first paramether we pass sourse image next we pass output image and final parameter we mentioned conversion type .
In this case we convert RGB to Gray scale for that we pass CV_RGB2GRAY as our 3rd parameter.

namedWindow("RGBImage",1);
namedWindow("GrayScaleImage",1);

imshow("RGBImage",RGBImage);
imshow("GrayScaleImage",grayScaleImage

From this line we can get our results.

By using custom Algorithm


#include <opencv2/highgui/highgui.hpp>
#include <opencv2/imgproc/imgproc.hpp>
#include <opencv2/core/core.hpp>

using namespace cv;

int main()
{
 Mat RGBImage;

 RGBImage =imread("c:/example_image.png");

 Mat grayScaleImage(RGBImage.size(),CV_8UC1);

 int rows=RGBImage.rows;
 int cols=RGBImage.cols;
 

 for(int i=0;i<rows;i++){
  for(int j=0;j<cols;j++){

   Vec3b intensity=RGBImage.at<Vec3b>(i,j);

   int blue=intensity.val[0];
   int green =intensity.val[1];
   int red=intensity.val[2];

   grayScaleImage.at<uchar>(i,j)=blue*0.0722+green*0.7152+red*0.2126;

  }

 }

 namedWindow("RGBImage",1);
 namedWindow("GrayScaleImage",1);

 imshow("RGBImage",RGBImage);
 imshow("GrayScaleImage",grayScaleImage);

 waitKey();
 return 0;
}

By using these 2 for loops we can access to each and every location of Mat object (pixel of image)

 
for(int i=0;i<rows;i++){
  for(int j=0;j<cols;j++){

   Vec3b intensity=RGBImage.at<Vec3b>(i,j);

   int blue=intensity.val[0];
   int green =intensity.val[1];
   int red=intensity.val[2];

   grayScaleImage.at<uchar>(i,j)=blue*0.0722+green*0.7152+red*0.2126;

  }
 } 

RGB has 3 color component we can consider every pixel is 3 dimensional vector .
Therefore by using this line we can assign it to 3d vector

   Vec3b intensity=RGBImage.at<Vec3b>(i,j);
.
Next we can get each and every 3 color component value from each pixel

     int blue=intensity.val[0];
     int green =intensity.val[1];
     int red=intensity.val[2];

Then we can calculate relevant gray scale value respect to these 3 color component values by using this function

grayScaleImage.at<uchar>(i,j)=blue*0.0722+green*0.7152+red*0.2126;

Then we assign that values to grayScaleImage Mat object pixel values


If you have Any question ,complain or suggestion please leave a comment .I always like to help you. :) See you soon .Thank you.